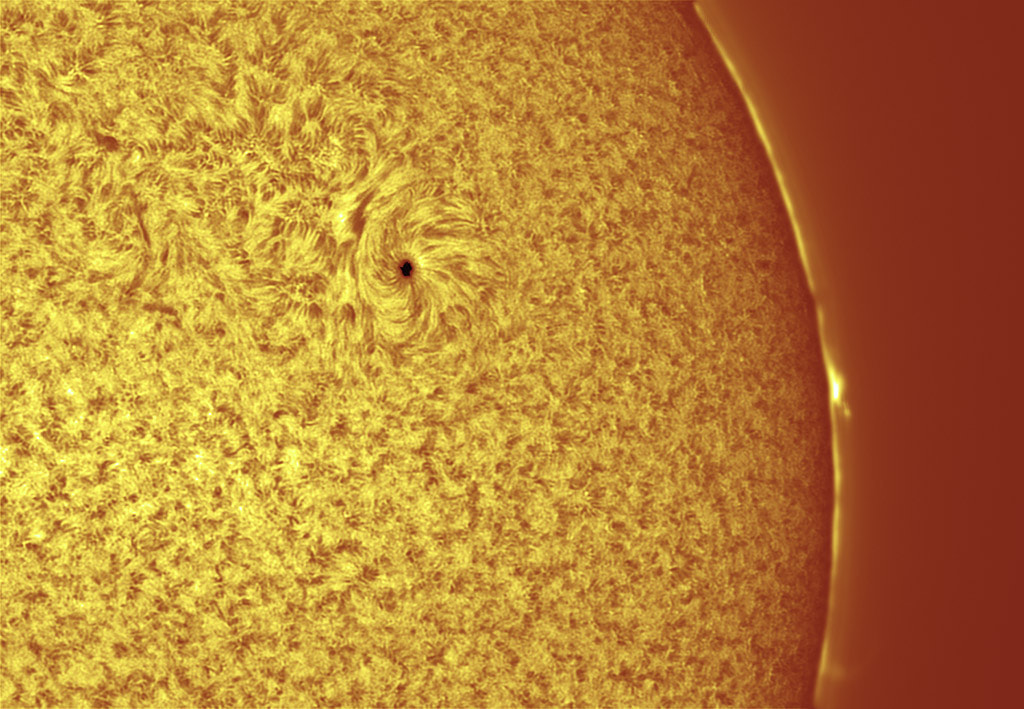
 astrophotography by TechnoBill/BillD at billd.net Oh. There are so many gorgeous and detailed images of the sun coming in that show the sun with a shaggy texture. I'm having flashbacks of goldenrod shag carpets from my childhood. I realize that this isn't the actual appearance and color of the sun due to filters...but I'm the artist and I'm running with it. I am in the middle of a large study in which I am working out how best to capture shagadelic luminosity. I also did a small study with mistakenly purchased silver-lined beads where I experimented with expanding the hexagon weave as large as I could before losing control of it. (Note to self--four strands of embroidery floss when weaving with only glass 6/0 beads; three strands are too loose and floppy). The small study is on a large glass charger. It is a birthday present. The larger 3-d study is on a 26" full-dome security mirror. I tried baby bear with mama bear tiles and spaced the tiles out more so that I could do more of a negative space treatment. I'm not very pleased with the mama bear tiles because the design gets more angular when beyond the first row. The surface of the sun doesn't have angles. I'm want the geometric negative space, but not in the beadwork which is too obvious. I wanted to incorporate second-hand beads into the project. A lot of people are selling off extra 11 or 10/0 yellow beads. So I have a bunch of those and I'm going to start adding those in the next couple of days. I started doing this with the smaller beads on Honeymoon and I loved it. My only concern is that by placing the beads hole side up I won't get the shaggy texture I want. Then I will have to switch over to placing them in whole rows from the needle. The downside of that is that the design will be more opaque with less mirror shining through and I will use more beads. I might try weaving the mama bears with only six reflective beads in the center. Then placing reflective beads in an arc through some of the woven voids and then continuing that line into the negative space to join it up with one from another tile. Yep. Blogging is magic. Oo. I just looked at a mama bear and traced it out with my finger. It will work! That's how I'm going to do the next piece. The 36" full dome bought surplus is here. It came in a very battered box that was barely taped shut, but it's fine for my purposes. Design note: I used a variety of thread colors and I really like the school bus yellow/orange. It gives the design more depth somewhat like the image below with the orange base color with yellow highlights. The thread color does a lot of visual heavy lifting in that it makes the piece more variegated, painterly, deep and less boring. Color-wise I keep going back and forth. I think I want to make a yellow/white sun with a mix of white and yellow reflective beads and then I see these gorgeous solar astronomy images and I revert back to all yellow.  Above is one of Andrew McCarthy's solar astrophotographs. He's on Twitter and Instagram as @CosmicBackground. He has takes astro photos from his back yard in California. He sells his images as printed or digital merch.
0 Comments
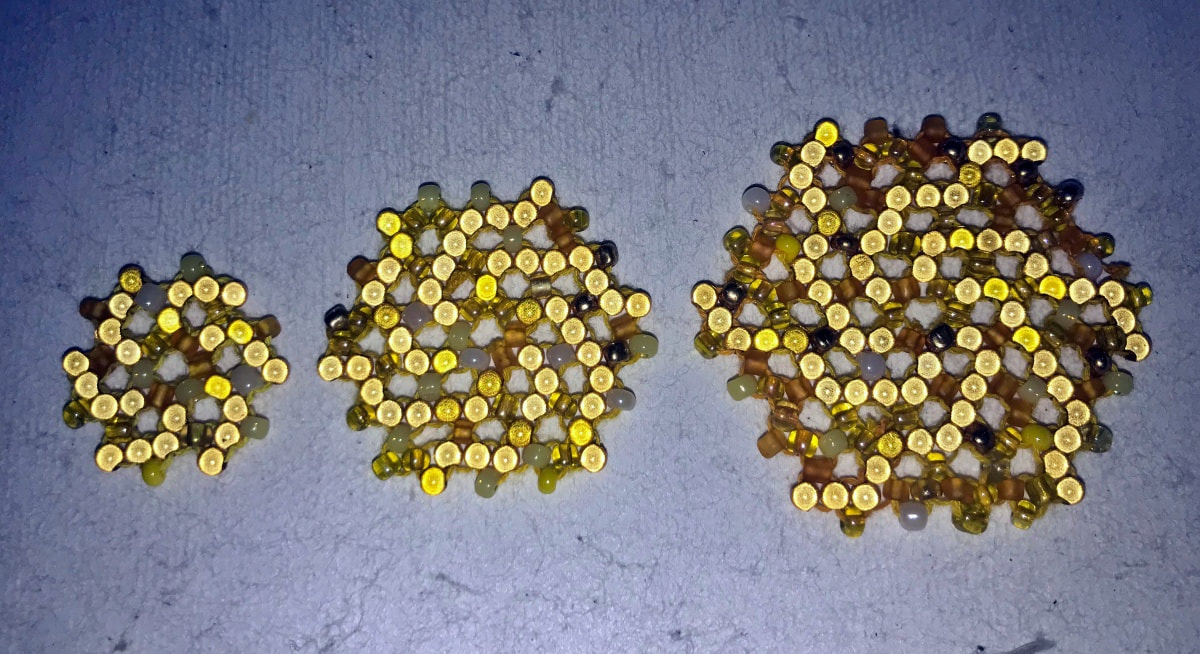 I used this bead weaving pattern for Juicy Sunrise, Blue Star, Black Star, Honeymoon Panopticon, Oceanic Panopticon, and now I'm working on a sun panopticon. It's versatile. The center areas of the hexagon let the underlying color or mirror come through and I can use fewer beads. The small one of 42 beads takes about 12 minutes to make. The middle one with 90 beads takes about 23 minutes. Each size up is another layer out from the center. I don't have a name for this piece yet. Maybe Goldilocks? I don't know. For now I'm doing a study on a 26" full dome mirror. This is the pattern for the baby bear and mama bear tiles. Papa bear is just more of the same. I'm blogging this so I have a record of what pattern I used for what with instructions. I'm using 4mm reflective acrylic miracle beads and size 6/0 glass seed beads to get the spiral design of the secondary pattern. If you don't want a secondary pattern, use one type of bead and ignore the R's and G's. R means "reflective" and G means "glass" to get this secondary pattern. Start with a 54" piece of thread on a beading needle. I like a three strands of waxed embroidery thread. I like to use lip balm for wax. (It tames the cotton fibers and reduces annoying kinking and knotting.) Use whatever you like. I only use embroidery thread for interior pieces. Use whatever you like. Add G, R, G and make a knot. Weave back through one of the yellows. (3 beads ring) Add R, G Weave through the middle previous G bead, then weave back through both of this R and G. (5 beads) AddG, R Weave back through previous G bead. (7 beads) Add R, G Weave back through previous G, then back through this R & G (9 beads) Add G, R Weave back through previous G, then back through this G. (11 beads) Add R Weave back through first and last Gs to make a ring with 6 glass beads in the center and 6 reflective beads on the outside. Weave back again through this R. This is your first hexagon ring. (12 beads) Add R, G Weave back through previous R, then back through this R. (14 beads) Add G, R Weave back through previous R, then back through this G and R. (16 beads) Add G, R Weave back through previous R, then back through G. (18 beads) Add R Weave back through outside of nearest R on center ring and back up through this G. This closes the 2nd ring. Weave back through R. (19 beads) Add R, G Weave back through previous R then back through this R. (21 beads) Add R, G Weave back through previous R, then back through this R and G. Weave through nearest R on center ring. This closes the 3rd ring. (23 beads) Add R Weave back through previous G and R, then back through this R. (24 beads) Add G, R Weave back through previous R, then back through this G and R. (26 beads) Add G, R Weave back through previous R, then back through G) (28 beads) Add R Weave down into the nearest R on the center ring and back through previous G. Weave back through this R. This closes the 4th ring. (29 beads) Add R, G Weave back through previous R, then back through this R. (31 beads) Add R, G Weave back through R and G. Weave through nearest R on center ring. This closes the 5th ring. (33 beads) Add R Weave back through previous G, R, then back through this R. (34 beads) Add G, R Weave back through G and R. (36 beads) Add G, R Weave back through previous R, then back through this G. (38 beads) Add R Weave through nearest R on center ring, then back through previous G and R. This closes the 6th ring. (39 beads) Add R, G Weave back through previous R, then back through this R. (41 beads) Add R Weave through the adjacent Y, then back up through previous R and this R. This closes the 7th ring. (42 beads) This is the baby bear hexatile. You can also make a heart shape by stopping after closing the third ring. (I used this for Honeymoon Panopticon.) Now to complete the mama bear layer... Add R, G Weave back through previous R, then back through this R. (44 beads) Add G, R Weave back through previous R, then back through G and R. Weave through the nearest G on the baby bear row. This closes the 8th ring. (46 beads) Add R Weave back through previous R, then through G that closes the ring. Weave back through this R. (47 beads) Add R, G Weave back through previous R, then through this R, G. (49 beads) Add G, G Weave through previous Y, then back through second G. (51 beads) Add R Weave through nearest R on baby bear row, then back through previous G. Weave back through R. This closes the 9th ring. (52 beads) Add R, G Weave through previous R, then back through R. (54 beads) Add R Weave through G in the center, then back through previous R and this R. This closes the 10th ring. (55 beads) Add G, R Weave through previous R, then back through this G (57 beads) Add G, G Weave through previous G, then back through both this G, G. Weave through R on baby bear. This closes the 11th ring. (59 beads) Add R Weave through previous G, R, then through this R. (60 beads) Add G, R Weave through previous R and this G, R. Weave through G on baby bear. This closes the 12th ring. (62 beads) Add R Weave through previous R, G, then through this R. (63 beads) Add R, G Weave through previous R, then through R, G (65 beads) Add G, G Weave through previous G, then through nearest of these G's. (67 beads) Add R Weave through center R, then through previous G, R. This closes the 13th ring. (68 beads) Add R, G Weave through previous R, then through this R. (70 beads) Add R Weave through G on baby bear, through previous R and this R. This closes the 14th ring. (71 beads) Add G, R Weave through previous R, then through this G. (73 beads) Add G, G Weave through previous G, then through both G, G, then through R on baby bear. This closes the 15th ring. (75 beads) Add R Weave through previous G, R, then through this R. (76 beads) Add G, R Weave through previous R, then through this G and R. Weave through G on baby bear. This closes the 16th ring. (78 beads) Add R Weave back through R, then weave through prev. G and this R. (79 beads) Add R, G Weave through previous R, then back through this R, G. (81 beads) Add G, G Weave through previous G, then through this Y (83 beads) Add R Weave through R on baby bear, then through previous G, then this R. This closes the 17th ring. (84 beads) Add R, G Weave through previous R, then back through this R. (86 beads) Add R Weave though G on baby bear, then through previous R, then this R. This closes the 18th ring. (87 beads) Add G, R Weave through previous R, then through this G. (89 beads) Add G Weave through the old G, then back through this G. This closes the 19th ring. (90 beads) Weave through several more beads then cut the thread. |
artist
Julie Mars' current events, projects, & inspirations. Archives
July 2024
Categories
All
|
 RSS Feed